 Skip to content
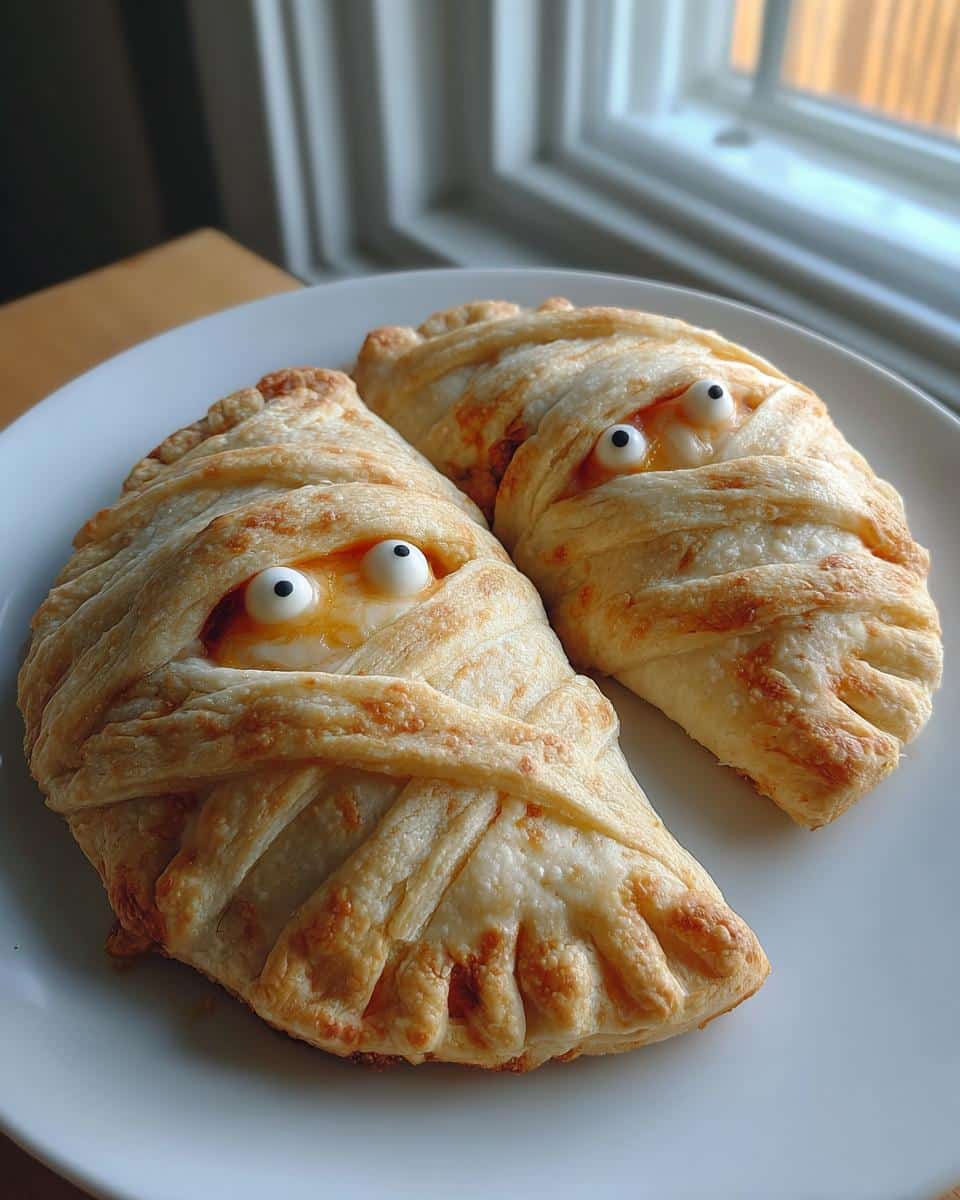
Okay, so Halloween is practically breathing down our necks, and you *know* I’m all about the spooky snacks! These Mummy Pizza Pockets are seriously my go-to for a reason. They’re ridiculously cute, super easy to whip up even when you’re in a Halloween frenzy, and the best part? They’re totally dairy-free! My little monsters absolutely adore them, and honestly, I sneak a few myself. Watching their faces light up when they see these little guys all wrapped up and ready to haunt their tummies is just the best. This recipe for Mummy Pizza Pockets (Dairy-Free Cheese Option) is a total lifesaver for allergy-friendly parties!
Why You’ll Love These Mummy Pizza Pockets (Dairy-Free Cheese Option)
Seriously, these little pizza mummies are a win-win-win! They’re:
- So Easy: You can totally make these in a flash.
- Kid-Approved: Kids go absolutely bonkers for them!
- Super Festive: They scream Halloween!
- Dairy-Free Friendly: Perfect for everyone to enjoy.
- Party Perfect: A guaranteed hit at any Halloween bash.
Essential Ingredients for Mummy Pizza Pockets (Dairy-Free Cheese Option)
You really don’t need much for these spooky little guys, which is part of why I love them so much! First off, you’ll need one can (about 8 ounces) of refrigerated pizza dough. This stuff is a lifesaver on busy nights. Then, grab about half a cup of your favorite pizza sauce – nothing fancy, just a good basic one will do. The star of the show is definitely the cheese, so you’ll want a cup of shredded dairy-free mozzarella cheese. Make sure it melts nicely! For those adorable mummy eyes, I usually use about a quarter cup of dairy-free mini chocolate chips or some cute edible candy eyes. Oh, and if you want them extra golden and yummy, have a tablespoon of olive oil handy for brushing – but it’s totally optional!
Ingredient Notes and Substitutions
The biggest thing here is to double-check that everything is *certified* dairy-free. You don’t want any surprises popping up! If you’re going for a vegan vibe, make sure your pizza dough and sauce are vegan-friendly too. Sometimes, I’ll even use a different brand of dairy-free cheese, and they usually turn out great. If you can’t find mini chocolate chips for the eyes, just regular dairy-free chocolate chips chopped up work fine, or those little candy eyes are super cute and easy to find around Halloween. Honestly, the dough is pretty forgiving, so don’t stress too much if it tears a little while you’re wrapping!
Creating Your Spooky Mummy Pizza Pockets (Dairy-Free Cheese Option)
Alright, let’s get these little guys ready to haunt your kitchen! It’s super simple, I promise. First things first, preheat your oven to a nice hot 400°F (that’s 200°C). While it’s heating up, grab a baking sheet and line it with some parchment paper. This makes cleanup a breeze – trust me, no one wants sticky pizza dough stuck to their baking pan!
Step-by-Step Preparation Guide
Now, take that can of pizza dough and unroll it. It’s usually a bit sticky, so don’t be surprised if it tries to roll itself back up! Cut the dough into strips, about 1 inch wide. They don’t have to be perfect, honestly. Then, take each strip and spread a thin layer of pizza sauce all over it. Just leave a little bit of a border around the edges so the sauce doesn’t ooze out everywhere. Next, sprinkle that lovely dairy-free mozzarella cheese over the sauce. Pile it on, but not *too* much, or it’ll all squish out. Now for the fun part: wrap those strips around the cheesy pizza sauce! Crisscross them like little mummy bandages. You can make them look as messy or neat as you like. Pop them onto your prepared baking sheet. This whole prep part usually takes me about 15 minutes, tops!
Baking Your Mummy Pizza Pockets to Perfection
If you want that extra golden touch, now’s the time to brush the tops of your mummy pockets with a little olive oil. Then, pop them into your preheated oven. Bake them for about 10 to 12 minutes. You’re looking for that dough to be puffed up and golden brown, and the cheese to be all melty and gooey. Keep an eye on them, because ovens can be a little wild sometimes!
Tips for Perfect Mummy Pizza Pockets (Dairy-Free Cheese Option)
Want your mummy pizza pockets to look like they’re straight out of a Halloween movie? Here are a few tricks! When you’re wrapping the dough strips, try to overlap them just enough so the cheese doesn’t all escape, but not so much that the dough doesn’t cook through. A little bit of dough peeking through is totally fine and adds to the mummy charm! For the eyes, placing them *after* baking means they won’t melt or burn, and you can get them just right. If you’re worried about a soggy bottom, make sure your oven is fully preheated and don’t overload the cheese. A thin layer of sauce is better than a thick one, too!
Serving and Storing Your Halloween Pizza Pockets
These little mummy pizza pockets are best served warm, right after they’ve cooled just enough so you don’t burn your tongue on the melty dairy-free cheese! They’re perfect for dipping into extra pizza sauce or even a bit of ranch dressing if you’re feeling fancy. If you happen to have any leftovers (which is rare in my house!), just pop them into an airtight container in the fridge. They’ll keep for a couple of days. To reheat, just pop them back in the oven for a few minutes at around 350°F until they’re warm and gooey again. You can totally make these ahead of time, too, which is a lifesaver for busy Halloween party days!
Frequently Asked Questions About Mummy Pizza Pockets (Dairy-Free Cheese Option)
Got questions about these spooky little bites? I’ve got answers!
Can I make vegan mummy pizza pockets? Absolutely! Just make sure your pizza dough and pizza sauce are vegan-friendly. For the eyes, use dairy-free mini chocolate chips or vegan candy eyes. It’s a super easy swap! For more vegan inspiration, check out these dairy-free crockpot recipes.
What kind of dairy-free cheese works best for these mummy pizza pockets? Honestly, most shredded dairy-free mozzarella cheeses will work! I find brands that are known for melting well are the best bet so you get that gooey center. Just make sure it’s certified dairy-free so everyone can enjoy them! For more ideas on dairy-free cooking, explore our dairy-free fettuccine alfredo sauce recipe.
How do I make the mummy bandages look realistic? Don’t overthink it! Just wrap the dough strips around the cheese filling, overlapping them a bit. You can crisscross them, leave little gaps, or even twist the dough strips slightly for a textured look. It’s meant to look a little messy and homemade, that’s part of the fun!
Can I use regular pizza dough? Yes, you can! Just double-check the ingredients to ensure it doesn’t contain any dairy if you need a dairy-free option. Most refrigerated pizza doughs are naturally dairy-free, but it’s always good to peek at the label. For more dairy-free cookie recipes, check out our other posts.
Nutritional Information for Mummy Pizza Pockets
Just a little heads-up, the nutritional info for these mummy pizza pockets can really change depending on the exact ingredients and brands you use. Think about the specific dairy-free cheese and dough you pick! So, consider these numbers a general idea, not a hard-and-fast rule. The serving size is usually about one mummy pocket.
Print
Fabulous Mummy Pizza Pockets (Dairy-Free option)
- Total Time: 27 minutes
- Yield: Approximately 8-10 mummy pockets 1x
- Diet: Dairy-Free
Description
Fun and spooky dairy-free mummy pizza pockets, perfect for Halloween parties. These easy-to-make treats feature a cheesy pizza filling wrapped in pizza dough strips to resemble mummies and decorated with edible eyes.
Ingredients
- 1 can (8 oz) refrigerated pizza dough
- 1/2 cup pizza sauce
- 1 cup shredded dairy-free mozzarella cheese
- 1/4 cup dairy-free mini chocolate chips or edible candy eyes
- 1 tablespoon olive oil (optional, for brushing)
Instructions
- Preheat your oven to 400°F (200°C). Line a baking sheet with parchment paper.
- Unroll the pizza dough and cut it into 1-inch wide strips.
- Spread a thin layer of pizza sauce onto each dough strip, leaving a small border.
- Sprinkle the dairy-free mozzarella cheese over the sauce.
- Wrap each strip of dough around a portion of the cheese, creating a mummy shape. You can crisscross the strips to make it look like bandages.
- Place the mummy pizza pockets onto the prepared baking sheet.
- If desired, brush the tops with a little olive oil for a golden finish.
- Bake for 10-12 minutes, or until the dough is golden brown and the cheese is melted.
- Once cooled slightly, use the dairy-free chocolate chips or candy eyes to create the mummy’s eyes.
Notes
- Ensure all ingredients used are certified dairy-free.
- For a vegan option, confirm your pizza dough and sauce are vegan.
- Adjust baking time based on your oven.
- These can be made ahead and reheated.
- Prep Time: 15 minutes
- Cook Time: 12 minutes
- Category: Appetizer
- Method: Baking
- Cuisine: American
Nutrition
- Serving Size: 1 mummy pocket
- Calories: Approximately 150-200 kcal (will vary based on specific ingredients)
- Sugar: Varies
- Sodium: Varies
- Fat: Varies
- Saturated Fat: Varies
- Unsaturated Fat: Varies
- Trans Fat: 0g
- Carbohydrates: Varies
- Fiber: Varies
- Protein: Varies
- Cholesterol: 0mg
Keywords: mummy pizza pockets, dairy-free cheese, Halloween snacks, kid-friendly, party food, vegan pizza pockets, easy recipes, pizza bites, Halloween party