 Skip to content
Alright, my fellow kitchen adventurers! Can you feel it? That little crisp in the air, the rustling leaves, and the undeniable urge to whip up something *spooky* and utterly delicious? Yep, it’s that magical time of year again, and that means it’s time for Halloween Cookies! I’ve been baking for this holiday for as long as I can remember, and let me tell you, there’s nothing quite like the joy of creating these festive little treats. This recipe is my go-to because it’s just SO versatile. Whether you’re aiming for adorable little ghosts, creepy crawly spiders, or just a classic pumpkin spice delight, these cookies are your blank canvas. They’re perfect for parties, a sweet surprise for friends, or just a fun afternoon project for you and the kiddos. Get ready to make some seriously enchanting Halloween Cookies that everyone will be howling about!
Gather Your Spooky Supplies: Essential Halloween Cookies Ingredients
Okay, so to get these amazing Halloween Cookies baked up, we need to gather our supplies! Think of it like assembling your potion ingredients. First up, we need 1 cup of unsalted butter, and it HAS to be softened. This is super important for getting that nice, fluffy texture when we cream it. Then we’ve got 1 cup of granulated sugar to make them sweet. For richness, we’ll need 1 large egg and 1 teaspoon of vanilla extract – nothing beats that classic flavor! For the structure of our cookies, grab 2 1/2 cups of all-purpose flour, 1 teaspoon of baking powder to give them a little lift, and 1/2 teaspoon of salt to balance everything out. Now for the fun part: food coloring! You’ll want some orange, black, and green to really bring the Halloween magic. And of course, we need Halloween-themed sprinkles and edible decorations – think candy eyeballs, little bats, or spooky sugar shapes. Those are essential for making our Halloween Cookies truly pop!
The Foundation: Basic Cookie Dough Components
Let’s talk about the stars of our cookie dough show! That softened unsalted butter and granulated sugar are going to get creamed together until they’re super light and fluffy. This step is key, trust me! It whips air into the dough, which is what makes our cookies tender. The large egg and vanilla extract are going to add moisture and that lovely, comforting flavor that just screams “homemade goodness.” And then our dry team: the all-purpose flour for structure, baking powder for a little bit of lift, and that little pinch of salt to make all the other flavors sing. Together, these make the perfect base for our Halloween masterpieces.
Bringing the Halloween Spirit: Coloring and Decorations
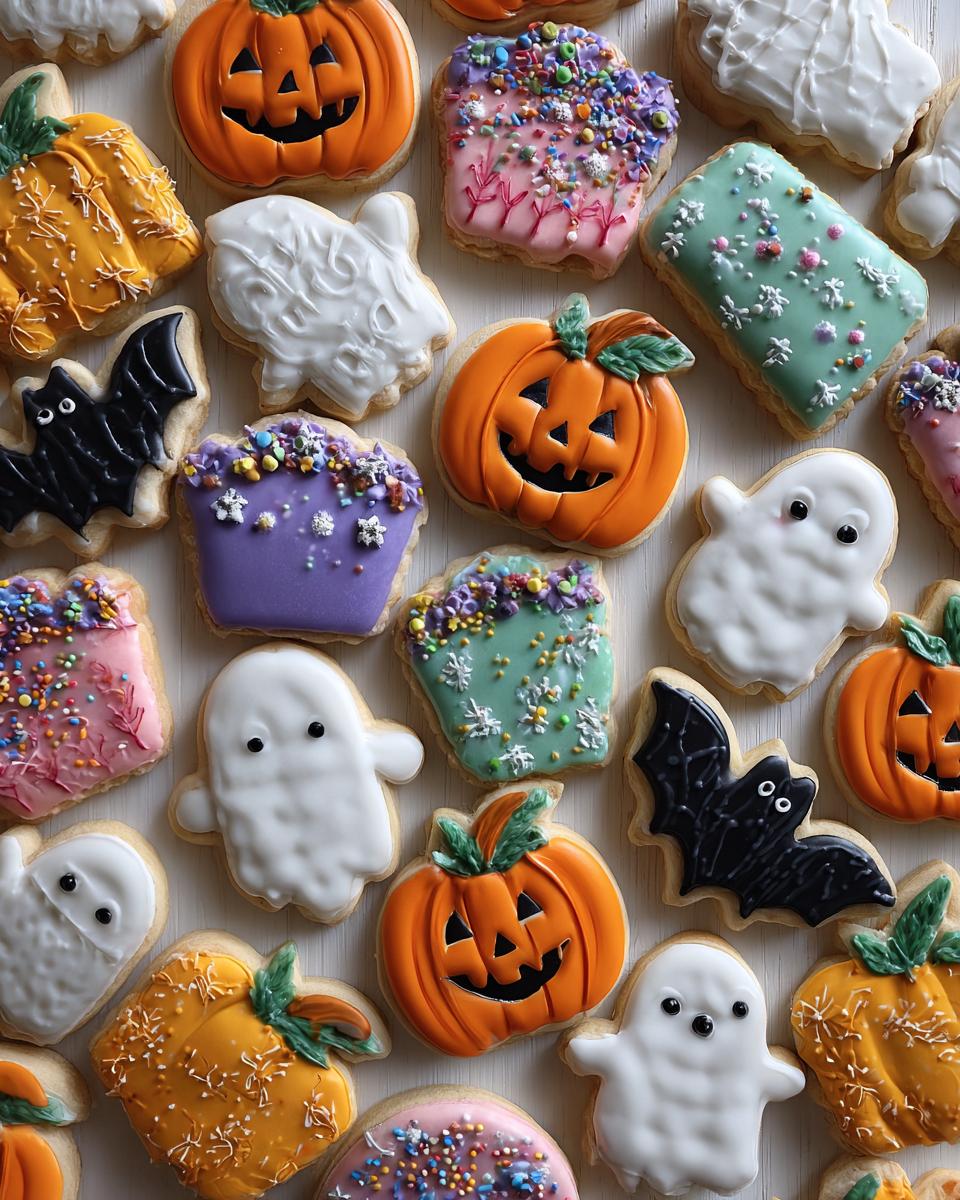
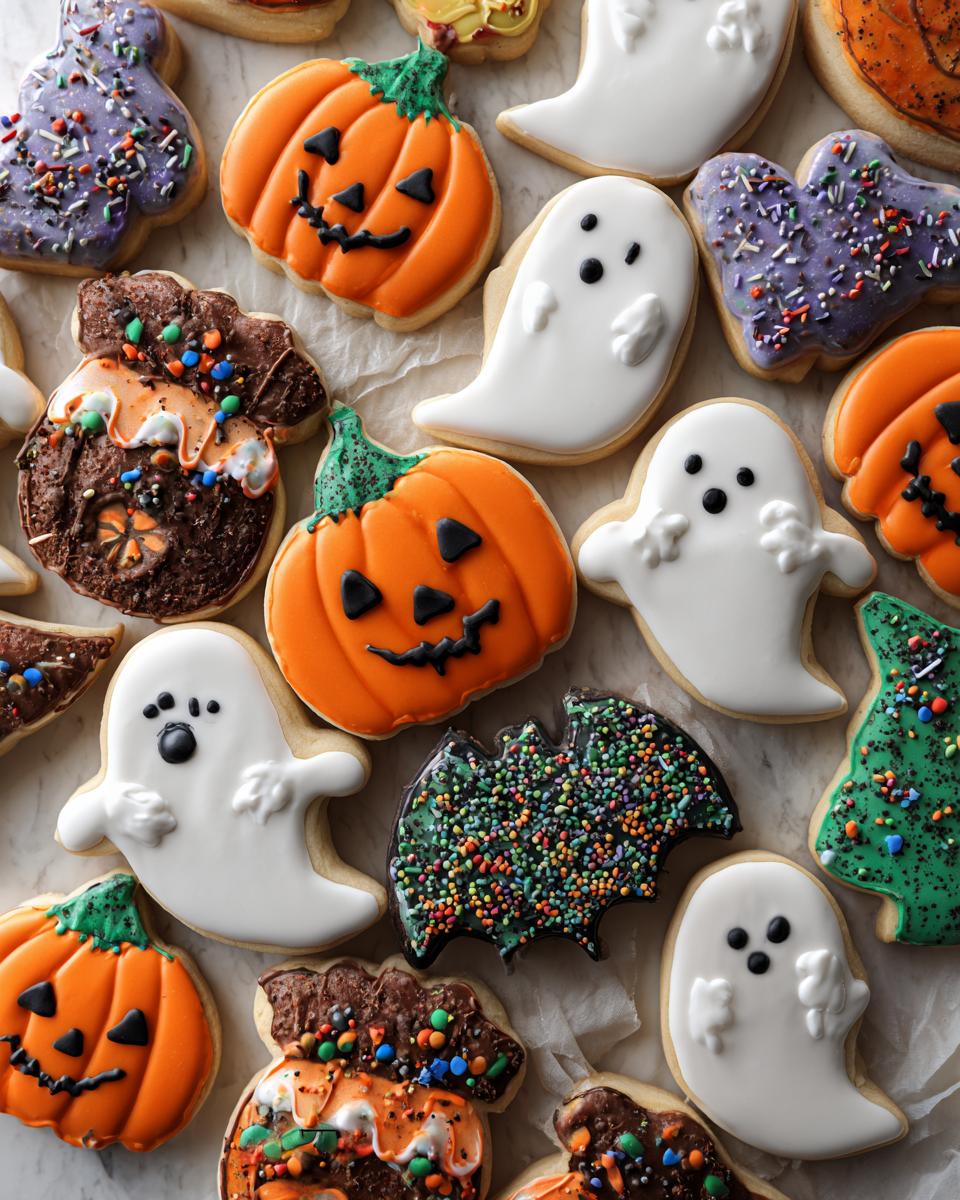
Now for the really fun part that turns our basic cookies into spectacular Halloween Cookies! The food coloring is where the spooky transformation happens. You can go all out with vibrant oranges for pumpkins, deep blacks for spooky nights, or eerie greens for monster vibes. Don’t be shy with it! And then, the decorations! This is where you can really let your creativity shine. Think about using ghost-shaped sprinkles, little candy eyeballs that stare right back at you, or maybe some black icing to draw spider webs. These details are what make your Halloween Cookies truly unique and totally festive for any party or treat bag!
Crafting Your Perfect Halloween Cookies: Step-by-Step Instructions
Alright, let’s get down to business and make these amazing Halloween Cookies! It’s not complicated, I promise, but a few little tricks will make all the difference. We’ll start with getting our dough ready, then move on to shaping and baking, and finally, the super fun part – decorating! Just follow along, and you’ll have a batch of spooktacular treats in no time.
Preparing the Dough for Festive Fun
First things first, let’s get that dough ready for its Halloween makeover! Grab your mixer and cream together that softened butter and sugar until it’s nice and fluffy – think pale and airy. Then, beat in your egg and vanilla extract until everything is well combined. In a separate bowl, whisk together your flour, baking powder, and salt. Now, here’s where you need to be gentle: gradually add the dry ingredients to the wet ingredients. Mix them *just* until they come together; you don’t want to overmix this dough, or your cookies might get tough! Once it’s just combined, divide the dough into portions and add your food coloring – orange, black, green, whatever your spooky heart desires! Give each portion a good mix until the color is uniform. Then, wrap each colored dough ball in plastic wrap and pop them into the fridge for at least 30 minutes. Trust me, chilling the dough is crucial; it makes it so much easier to roll out and cut without it getting sticky and messy!
Shaping and Baking Your Halloween Cookies
Once your dough has had its little chill session, it’s time to get creative! Preheat your oven to 350°F (175°C). Lightly flour your work surface and grab your favorite Halloween cookie cutters – think pumpkins, ghosts, bats, or even just simple circles and squares that you can decorate later. Roll out your chilled dough to about 1/4-inch thickness. If it starts to get too soft while you’re working, just pop it back in the fridge for a few minutes. Cut out your shapes and carefully place them onto a baking sheet that’s lined with parchment paper. Don’t crowd them too much! Bake them for about 8 to 10 minutes. You’re looking for the edges to be just lightly golden. They’ll continue to cook a bit on the hot baking sheet, so don’t overbake them! Let them cool on the baking sheet for a minute or two before transferring them to a wire rack to cool completely. They need to be totally cool before we even THINK about decorating!
The Grand Finale: Decorating Your Halloween Cookies
This is where the real magic happens, folks! Once your Halloween Cookies are completely cool, it’s time to unleash your inner artist. You can whip up a simple buttercream frosting or use store-bought icing. Tint it with your food coloring to match your dough or create fun contrasts. Think spooky black icing for spider webs on orange cookies, or creepy green frosting for monster cookies! Don’t forget those candy eyeballs – they instantly make any cookie look adorably sinister. You can also use Halloween-themed sprinkles, edible glitter, or even draw little faces and patterns with edible markers. If you did plain sugar cookies, a simple dusting of powdered sugar can look really elegant too, maybe with a few strategically placed candy pumpkins. Get the kids involved here; they absolutely love this part! The possibilities are endless, so have fun with it and make your Halloween Cookies as unique and spooky as you want!
Tips for Spooktacular Halloween Cookies Success
Alright, let’s talk about making sure your Halloween Cookies turn out absolutely perfect every single time! There are a few little secrets and tips that I’ve picked up over the years that really make a difference. First off, that dough chilling step? It’s not just a suggestion, it’s pretty much a requirement for easy handling and getting those super sharp cut-outs. If your dough gets too soft while you’re rolling, don’t hesitate to pop it back in the fridge for a bit – it’s way better than dealing with sticky, misshapen cookies!
Mastering the Dough for Easy Halloween Treats
Seriously, don’t skip chilling that dough! When it’s nice and cold, it’s so much easier to roll out evenly without it sticking to your counter or your rolling pin. I usually aim for about 1/4-inch thickness for a good balance of chewy and crisp. If you’re cutting out intricate shapes, a sharp cookie cutter works wonders. And remember, when you’re mixing in the flour, just do it until it’s *barely* combined. Overmixing is the enemy of tender cookies; it develops the gluten too much and can make them tough instead of delightful. So, gentle hands are key here!
Baking and Decorating Brilliance for Halloween Cookies
When it comes to baking, keep an eye on those edges! They should just start to turn a light golden brown. Ovens can be so finicky, so it’s always better to underbake slightly than to overbake. The cookies will continue to firm up as they cool. For decorating, think about your color palette – do you want bright and cheerful, or dark and spooky? A little piping bag with a small round tip is fantastic for drawing details like spider webs or little stitches. And don’t forget to have fun with sprinkles! There are so many fun Halloween-themed ones out there now that can instantly elevate your Halloween Cookies from good to spooktacular!
Your Questions Answered: Common Halloween Cookies Queries
Got questions about whipping up these festive Halloween Cookies? I totally get it! It’s always good to have a few things cleared up before you dive in. Let’s tackle some of the most common ones I hear:
Can I make these gluten-free Halloween cookies? Oh, absolutely! You can usually swap out the all-purpose flour for a good quality 1-to-1 gluten-free baking flour. Just make sure it has xanthan gum in it. You might need to adjust the chilling time a little, as gluten-free dough can sometimes be a bit stickier, but it’s totally doable and still results in super yummy treats!
What are some easy Halloween treats for kids to help make? This recipe is actually perfect for little helpers! They can help cream the butter and sugar (with supervision!), stir in the dry ingredients gently, and the decorating part is their absolute favorite. Letting them choose the colors, sprinkles, and drawing faces on the cookies is so much fun and makes them feel super accomplished. They’ll love making their own spooky Halloween cookies!
How far in advance can I make these Halloween Cookies? The un-decorated cookies, once completely cooled, can be stored in an airtight container at room temperature for about 3-4 days. If you want to get ahead even further, you can freeze the un-decorated, cooled cookies for up to a month. Just make sure they’re sealed well! Decorating them closer to your party or event will keep them looking their freshest and brightest.
Enjoying Your Delicious Halloween Cookies
So, you’ve made these amazing Halloween Cookies and now you want to keep them tasting just as delicious, right? Easy peasy! Once they’re completely cool, store them in an airtight container. If they’re plain or just have a simple glaze, they’ll stay fresh at room temperature for about 3 to 4 days. If you’ve gone wild with lots of frosting and delicate decorations, it’s often best to store them in a single layer so nothing gets smushed. For longer storage, you can freeze the plain, cooled cookies for up to a month – just make sure they’re wrapped up tight! Reheating isn’t usually necessary, but if they feel a little stale, a few seconds in a warm oven can sometimes perk them up.
Understanding the Nutrition of Your Halloween Cookies
Just a little heads-up about the nutrition info for these fun Halloween Cookies! Keep in mind that the numbers you see are just estimates, okay? They can totally change depending on the specific brands of ingredients you use, how thick you roll your cookies, or how much frosting and sprinkles you load on. It’s all part of the delicious adventure!
Print
Spooky Halloween Cookies: 5 Easy Decorating Ideas
- Total Time: 40 minutes plus chilling and decorating time
- Yield: 24 cookies 1x
- Diet: Vegetarian
Description
Festive and creative Halloween cookie recipes and decorating ideas. Make spooky, cute, and delicious treats for your Halloween parties and celebrations. Perfect for all skill levels.
Ingredients
- 1 cup unsalted butter, softened
- 1 cup granulated sugar
- 1 large egg
- 1 teaspoon vanilla extract
- 2 1/2 cups all-purpose flour
- 1 teaspoon baking powder
- 1/2 teaspoon salt
- Food coloring (orange, black, green)
- Halloween-themed sprinkles and edible decorations
Instructions
- Cream together butter and sugar until light and fluffy.
- Beat in egg and vanilla extract.
- In a separate bowl, whisk together flour, baking powder, and salt.
- Gradually add dry ingredients to wet ingredients, mixing until just combined.
- Divide dough and tint with food coloring as desired.
- Chill dough for at least 30 minutes.
- Preheat oven to 350°F (175°C).
- Roll out dough and cut into Halloween shapes using cookie cutters.
- Place cookies on a baking sheet lined with parchment paper.
- Bake for 8-10 minutes, or until edges are lightly golden.
- Let cool completely on a wire rack.
- Decorate with frosting, sprinkles, and edible decorations.
Notes
- Chill dough is crucial for easy handling and sharp cut-outs.
- Do not overmix the dough once flour is added.
- Baking time may vary based on cookie thickness and oven.
- Experiment with different frosting colors and decorating techniques.
- Prep Time: 30 minutes
- Cook Time: 10 minutes
- Category: Desserts
- Method: Baking
- Cuisine: American
Nutrition
- Serving Size: 1 cookie
- Calories: 150
- Sugar: 10g
- Sodium: 50mg
- Fat: 8g
- Saturated Fat: 5g
- Unsaturated Fat: 3g
- Trans Fat: 0g
- Carbohydrates: 18g
- Fiber: 0.5g
- Protein: 2g
- Cholesterol: 25mg
Keywords: Halloween Cookies, Halloween cookie recipes, spooky Halloween cookies, easy Halloween treats, Halloween sugar cookies, pumpkin spice cookies, DIY Halloween cookie decorating, Halloween party snacks, cute Halloween cookie ideas, gluten-free Halloween cookies, Halloween cookie decorating tips