 Skip to content
Oh, Halloween! It’s honestly my favorite time to get creative in the kitchen, and this dessert recipe is an absolute showstopper. Seriously, if you’re looking for that *perfect* treat to wow your party guests or just make a cozy night in extra special, you’ve found it! These aren’t just any cookies; they’re little bites of festive fun that taste as amazing as they look. I just love seeing the kids’ faces light up when they see them – it’s pure magic. Get ready to whip up some delicious, spooky magic that everyone will be talking about!
Essential Ingredients for Your Halloween Dessert
Alright, let’s talk about what goes into making these amazing Halloween desserts! It’s really not complicated, and using good ingredients makes all the difference. You’ll need some basics that probably live in your pantry already, plus a few fun extras to really make them sing for the season. Trust me, having everything ready to go makes the whole process so much smoother. Think of it as gathering your magical potion ingredients!
Flour, Leavening, and Salt
We start with the backbone of our cookies: all-purpose flour. It gives them structure. Then, we’ve got baking soda and a pinch of salt. The baking soda is what helps them puff up just a little, and the salt? It just balances out all the sweetness, making everything taste even better. Simple, but so important!
The Sweet and Creamy Base
Now for the good stuff! We need softened unsalted butter – and make sure it’s *softened*, not melted, okay? This is key for getting that lovely creamy texture when we beat it with the granulated sugar. Then comes a large egg to bind everything together, and a teaspoon of vanilla extract for that yummy, comforting flavor. This part is where the magic starts to happen, creating that perfect base for our cookies.
Bringing It All Together
Once our butter and sugar are all light and fluffy, we’ll gently add in our dry ingredients. The trick here is to mix until it’s *just* combined. Seriously, don’t go crazy mixing! Overmixing makes cookies tough, and we definitely don’t want that. We’re aiming for tender, melt-in-your-mouth goodness.
Finishing Touches for Your Halloween Dessert
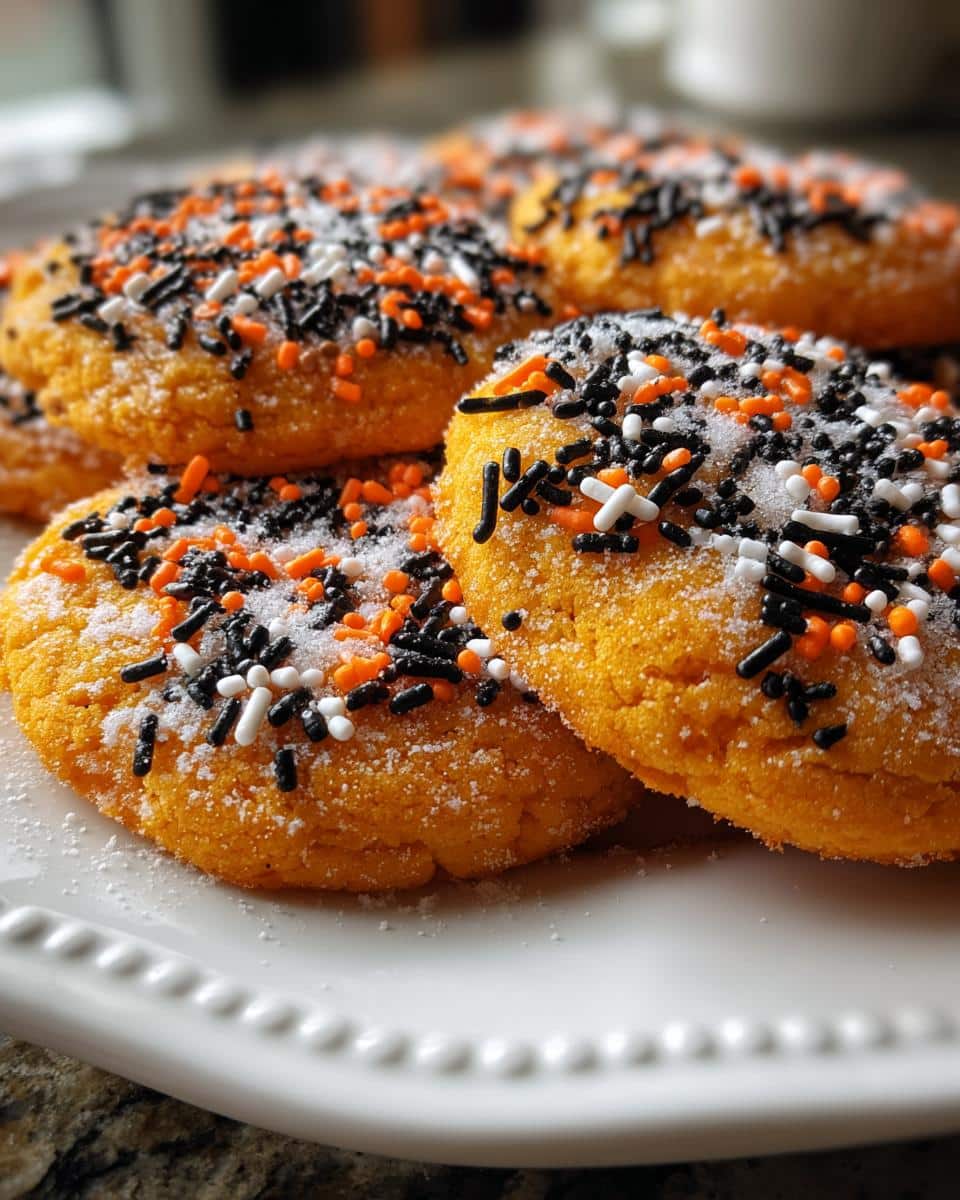
After baking and cooling, it’s time for the real fun! A simple dusting of powdered sugar gives them a nice, frosty look, like a little bit of Halloween magic. But you can go wild with Halloween-themed sprinkles or edible decorations! Think little ghosts, pumpkins, bats, or even just some black and orange sanding sugar. This is where your creativity shines and turns these simple cookies into the ultimate Halloween dessert.
Crafting Your Spooky Halloween Treats
Okay, this is where the real fun begins – making these spooky halloween treats come to life! Don’t worry, it’s a super straightforward process, and I’ll walk you through it step-by-step. The goal is to get that perfect cookie texture that’s just slightly crisp on the edges and wonderfully tender in the middle. And of course, we want them to look amazing for your Halloween party!
Preparing for Baking Success
First things first, let’s get our oven preheated to 350°F (175°C). This is super important because we want the oven nice and hot when the cookies go in so they bake evenly. While that’s heating up, grab your baking sheets and line them with parchment paper. Trust me on this one – parchment paper is your best friend! It prevents sticking and makes cleanup a breeze. No one wants to scrub baked-on cookie bits!
Mixing the Dough
Now, let’s bring it all together. We’ve already talked about creaming that butter and sugar until it’s fluffy, and beating in the egg and vanilla. So, the next step is to add our dry ingredients (that flour, baking soda, and salt mixture) to the wet ingredients. Remember what I said? Mix until it’s *just* combined. You should still see a few streaks of flour; that’s perfect! Overmixing develops the gluten too much and can make your cookies tough, and we want tender little bites of spooky goodness.
Shaping Your Halloween Dessert Dough
Time to get our hands a little messy! Grab a rounded tablespoon of dough. You can just drop these little mounds onto your prepared baking sheets, leaving about 2 inches between them because they will spread a bit. If you want them a little flatter and more uniformly shaped, just gently press down on each mound with the bottom of a glass or even your hand. It’s totally up to you how rustic or neat you want them to be!
Baking to Golden Perfection
Pop those baking sheets into your preheated oven. They usually take about 10 to 12 minutes. Keep an eye on them! You’re looking for the edges to be just lightly golden brown. They might still look a little soft in the center, and that’s okay! They’ll continue to set up as they cool. Once they’re out, let them hang out on the baking sheet for a few minutes – this helps them firm up enough to move. Then, carefully transfer them to a wire rack to cool completely. This is crucial before we decorate!
Decorating Your Halloween Dessert Ideas for Kids
This is where the magic really happens, especially for your halloween dessert ideas for kids! Once the cookies are totally cool, you can dust them with powdered sugar for a ghostly effect, or go all out with Halloween sprinkles and edible decorations. Think candy eyeballs, little pumpkin faces, bats, or even just some fun orange and black sanding sugar. Let the kids go wild with their creativity! It’s such a fun activity and makes each cookie totally unique. This really turns them into the ultimate halloween dessert!
Tips for Perfect Halloween Dessert Recipes
Making these halloween dessert recipes is pretty foolproof, but a few little tips can make sure they turn out just *perfect* every time. I’ve learned a thing or two from my kitchen adventures, and these little tricks really help avoid common oopsies and make your spooky treats even more spectacular. Plus, getting creative with the decorations is half the fun!
Dough Consistency Matters
Sometimes, depending on your flour or even the humidity, your dough might feel a little too sticky or perhaps a bit too dry. If it’s too sticky to handle, just pop the whole bowl in the fridge for about 15-20 minutes. It’ll firm right up! If it feels too dry and crumbly, add just a tiny splash of milk or vanilla extract, about a teaspoon at a time, until it comes together nicely. You want it soft and scoopable, not stiff or gooey.
Even Cooling is Key
Seriously, don’t rush the cooling! Trying to decorate warm cookies is a recipe for disaster. The powdered sugar will melt right off, and sprinkles will slide into a messy puddle. Let them cool completely on a wire rack. This helps them set up properly, giving you that nice crisp edge and tender center that’s perfect for decorating. Patience truly pays off here for your halloween dessert recipes!
Creative Decoration Ideas
Beyond sprinkles, think about using black or orange food coloring! You can divide your dough before you scoop and tint portions for striped cookies or marbled effects. Melted chocolate is also your friend – dip half the cookie or drizzle it on top. Edible markers can draw little faces on plain cookies, and candy eyeballs are always a hit for spooky creatures. Get wild with it – the more creative, the better!
Frequently Asked Questions for Your Halloween Dessert
Got questions about whipping up these festive Halloween treats? I’ve got you covered! It’s always good to have a few pointers, especially when you’re diving into some fun halloween dessert recipes. Here are some common things people ask, and my best advice!
Can I make these no bake halloween desserts?
Oh, that’s a great question! Because this recipe uses flour and baking soda and is meant to be baked for that perfect cookie texture, it’s not really designed to be a no-bake halloween dessert. The baking process is what gives it that lovely crisp edge and tender middle. If you’re looking for no-bake options, you might want to try things like chocolate-dipped pretzel rods with Halloween sprinkles or a spooky layered pudding parfait instead. Those are super fun and require no oven time at all!
How long do these halloween party desserts stay fresh?
These little halloween party desserts are pretty good at staying fresh for a few days, which is handy when you’re hosting! Once they’ve completely cooled, store them in an airtight container at room temperature. They should stay delicious for about 3 to 4 days. Just make sure they’re completely cool before you seal the container, otherwise, you might get some unwanted moisture inside. They’re usually gobbled up way before then, though!
What are some easy halloween desserts I can make with kids?
This recipe is actually fantastic for making with kids! The dough is easy to handle, and the decorating part is where they can really shine. Let them help scoop the dough (with a little supervision!), and then let them go wild with the sprinkles and edible decorations. They’ll absolutely love pressing candy eyeballs onto cookies or making little ghost shapes with powdered sugar. It’s such a fun way to get them involved in creating their own halloween dessert ideas for kids!
Understanding the Nutrition of Your Halloween Dessert
Now, I know we’re all about fun and flavor here, but it’s always good to have a general idea of what’s in our treats, right? These numbers are estimates, of course, since decorations can vary! But generally, one of these yummy cookies comes in around 150 calories, with about 8 grams of fat and 18 grams of carbs. It’s a sweet little indulgence perfect for your Halloween festivities!
Print
Amazing 1 halloween dessert magic
- Total Time: 32 minutes
- Yield: 24 cookies 1x
- Diet: Vegetarian
Description
Celebrate Halloween with these delightful and spooky dessert recipes. Perfect for parties or a fun family activity, these treats are sure to impress with their festive designs and delicious flavors.
Ingredients
- 1 cup all-purpose flour
- 1/2 teaspoon baking soda
- 1/4 teaspoon salt
- 1/2 cup unsalted butter, softened
- 1/2 cup granulated sugar
- 1 large egg
- 1 teaspoon vanilla extract
- 1/4 cup powdered sugar (for dusting)
- Halloween-themed sprinkles or edible decorations
Instructions
- Preheat your oven to 350°F (175°C). Line baking sheets with parchment paper.
- In a medium bowl, whisk together the flour, baking soda, and salt.
- In a large bowl, cream together the softened butter and granulated sugar until light and fluffy.
- Beat in the egg and vanilla extract until well combined.
- Gradually add the dry ingredients to the wet ingredients, mixing until just combined. Do not overmix.
- Drop rounded tablespoons of dough onto the prepared baking sheets, about 2 inches apart. Flatten slightly with the bottom of a glass or your hand.
- Bake for 10-12 minutes, or until the edges are lightly golden brown.
- Let the cookies cool on the baking sheets for a few minutes before transferring them to a wire rack to cool completely.
- Once cooled, dust with powdered sugar or decorate with Halloween-themed sprinkles and edible decorations.
Notes
- For a spooky effect, you can tint a portion of the dough with black or orange food coloring before baking.
- These cookies can be stored in an airtight container at room temperature for up to 3 days.
- Get creative with your decorations to match your Halloween theme!
- Prep Time: 20 minutes
- Cook Time: 12 minutes
- Category: Dessert
- Method: Baking
- Cuisine: American
Nutrition
- Serving Size: 1 cookie
- Calories: 150
- Sugar: 12g
- Sodium: 50mg
- Fat: 8g
- Saturated Fat: 5g
- Unsaturated Fat: 3g
- Trans Fat: 0g
- Carbohydrates: 18g
- Fiber: 0.5g
- Protein: 2g
- Cholesterol: 25mg
Keywords: halloween dessert, easy halloween desserts, spooky halloween treats, halloween dessert recipes, halloween party desserts, halloween dessert ideas for kids, halloween themed cupcakes