 Skip to content
Oh, the holidays! It’s that magical time of year when our homes fill with twinkling lights, the scent of pine, and, of course, the irresistible aroma of delicious food. But let’s be honest, hosting can be a whirlwind! That’s why I absolutely adore whipping up a batch of these delightful Christmas finger foods. They’re my secret weapon for stress-free entertaining. Seriously, you can have a whole spread of festive, bite-sized appetizers ready to go without spending hours in the kitchen. My favorite part? Seeing everyone’s eyes light up as they grab a perfectly portioned treat. It just makes the whole atmosphere feel so much more cozy and celebratory. These little gems are perfect for parties, casual get-togethers, or even just a festive movie night with the family.
Why You’ll Love These Christmas Finger Foods
Trust me, these little bites are a lifesaver during the busy holiday season! They’re the perfect combination of festive fun and no-fuss preparation. You’ll be reaching for this recipe again and again because:
- They’re incredibly easy to make, even if you’re not a baking whiz.
- They look absolutely adorable with their festive sugar coating – total party showstoppers!
- They’re perfectly portioned, making them ideal for mingling and munching.
- And oh my goodness, they taste amazing – sweet, buttery, and just a little bit crumbly.
Quick Holiday Finger Foods
Seriously, the whole process from mixing to baking takes under an hour. That means you can whip these up even on a busy holiday afternoon. They’re proof that delicious doesn’t have to mean time-consuming!
Festive Finger Food Recipes for Any Party
Whether you’re hosting a big bash or a small family gathering, these are just perfect. They add that extra special touch to any holiday party, making your spread look and taste amazing without any stress.
Gather Your Ingredients for These Christmas Finger Foods
Alright, let’s get our baking station ready! Having everything prepped before you start makes the whole process so much smoother. For these delightful little Christmas finger foods, you’ll need a few pantry staples and a couple of fun festive additions.
Essential Ingredients
- 1 cup all-purpose flour
- 1/2 cup unsalted butter, softened
- 1/4 cup granulated sugar
- 1/4 cup powdered sugar
- 1 large egg yolk
- 1 teaspoon vanilla extract
- 1/4 teaspoon salt
- 1/2 cup finely chopped pecans or walnuts (optional)
- Red and green decorating sugar
Ingredient Notes and Substitutions
The butter really needs to be softened – not melted! It makes a huge difference in how well it creams with the sugars. And for the nuts, if you have any little ones who aren’t fond of them, or if you just prefer them without, no worries at all! Just leave them out – the cookies are still totally delicious. If you can’t find decorating sugar, a little sprinkle of coarse turbinado sugar can give a nice sparkle too. And remember that note about making them a bit healthier? Feel free to cut back on the sugar just a tiny bit if you like, and maybe add a pinch of cinnamon or nutmeg to the dry ingredients for an extra warm, festive flavor boost.
Crafting Your Festive Christmas Finger Foods
Okay, let’s get our hands a little floury and make some magic happen! This is where the fun really begins. Don’t worry, these steps are super straightforward, and before you know it, you’ll have a beautiful batch of Christmas finger foods ready to impress.
Preparing the Dough
First things first, grab your softened butter and both sugars – the granulated and the powdered kind. Cream them together in a good-sized bowl until they get all light and fluffy. This usually takes a couple of minutes with an electric mixer, or a bit longer if you’re going old-school with a wooden spoon. Then, beat in that egg yolk and the vanilla extract. In a separate bowl, just give your flour and salt a quick whisk. Now, add the dry stuff to the wet stuff, but do it gradually. Mix until it’s *just* combined. Seriously, don’t overmix here – we want tender cookies, not tough ones!
Chilling and Shaping
Here’s a super important step: chilling the dough! Pop that bowl into the fridge for at least 30 minutes. This makes the dough much easier to handle and stops those cookies from spreading out too much in the oven. Once it’s nicely chilled, preheat your oven to 325°F (160°C) and get your baking sheets lined with parchment paper – trust me, this makes cleanup a breeze. Now, roll the dough into little balls, about an inch wide. Place them on your prepared baking sheets, leaving a little space between each one.
Baking and Cooling
Gently flatten each little ball with the bottom of a glass or even just your thumb. Now they’re ready for their festive sparkle! Bake them for about 12 to 15 minutes. You’re looking for the edges to be just lightly golden. They might still look a little soft in the middle, but that’s okay! Let them hang out on the baking sheets for a few minutes to firm up a bit before carefully transferring them to a wire rack to cool completely. Patience is key here – warm cookies can be delicate!
Decorating Your Christmas Finger Foods
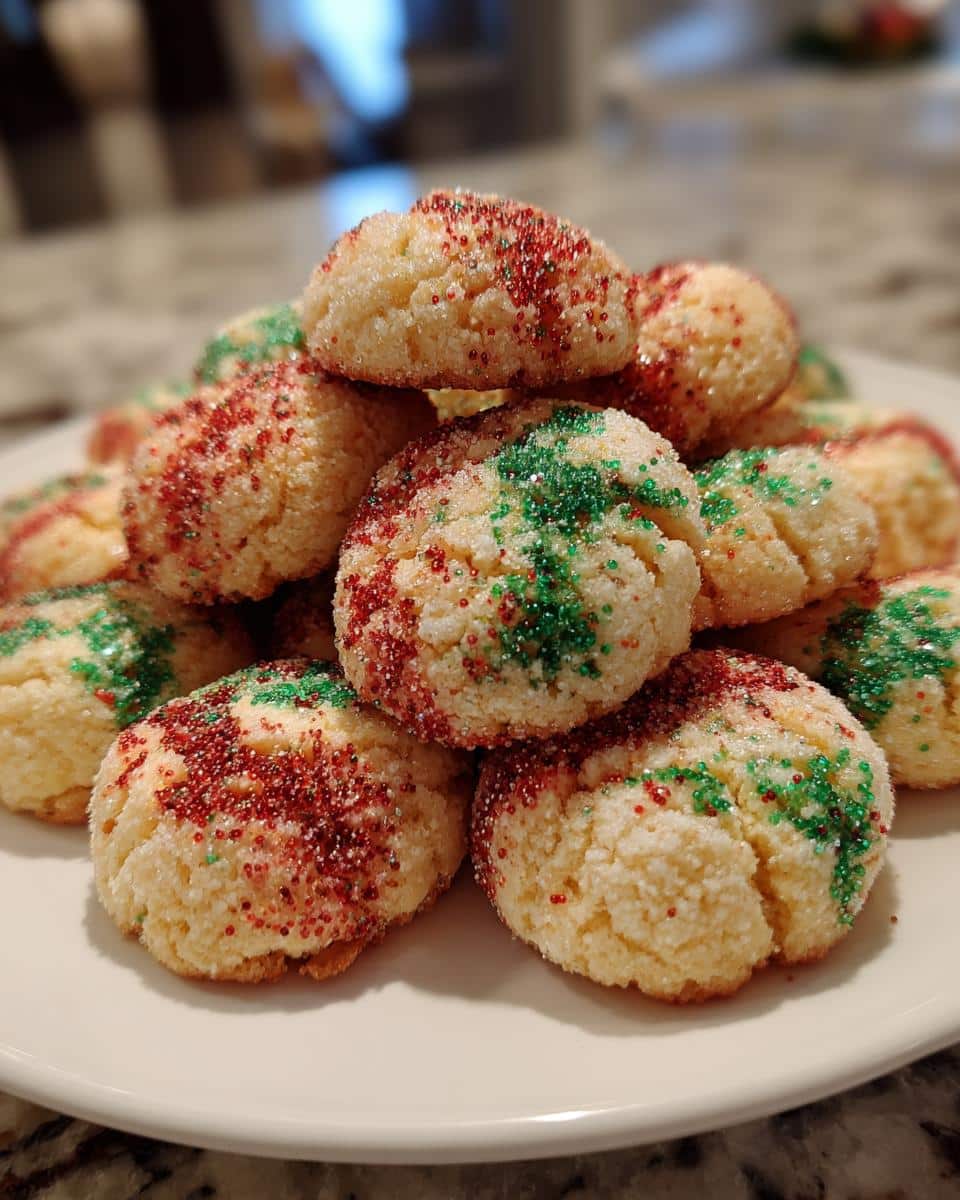
This is the part that makes them scream “Christmas!” Once the cookies have cooled down a bit on the baking sheet, go ahead and sprinkle them generously with that festive red and green decorating sugar. You can press it in gently or just let it sit on top. It adds that perfect pop of color and a little bit of sparkle that just screams holiday cheer!
Tips for Perfect Christmas Finger Foods
You know, the best part about these little Christmas finger foods is how forgiving they are! But a few little tricks can make them absolutely perfect every single time. I’ve learned a thing or two over the years, and these tips will help you get the most amazing texture and keep them tasting fresh, even if you’re making them ahead for a party.
Making Ahead and Storage
These cookies are total rockstars for making ahead. Honestly, they taste even better on day two! Once they’re completely cooled, just pop them into an airtight container. They’ll stay delicious at room temperature for up to 3 days. Just make sure they’re fully cooled before you stack them, or you might end up with a sticky mess!
Achieving the Best Texture
The secret to that perfect, slightly crumbly yet tender texture is really about not overbaking them and letting them cool properly. Keep an eye on them in the oven – you want those edges to be *lightly* golden, not dark brown. Pulling them out when they still seem a tad soft in the middle is key. Then, letting them firm up on the baking sheet for a few minutes before moving them to a wire rack ensures they don’t break apart and get that lovely, crisp-yet-chewy bite.
Frequently Asked Questions about Christmas Finger Foods
Got questions about these festive little bites? I’ve got you covered! It’s always good to have a few answers up your sleeve when you’re whipping up treats for the holidays.
Can I make these christmas finger foods gluten-free?
Oh, a great question! While this specific recipe is geared towards traditional baking, you *can* adapt it. Try swapping out the all-purpose flour for a good quality gluten-free all-purpose baking blend that contains xanthan gum. You might need to adjust the chilling time a bit, as gluten-free doughs can sometimes be a little stickier.
How do I store leftover christmas finger foods?
Storing these is super simple! Once they’re completely cooled, just pop them into an airtight container. They’ll stay perfectly yummy at room temperature for about 3 days. I usually just find a cool spot in the pantry or on the counter. Just make sure they’re totally cool before you put them away, otherwise, you might get some condensation in the container and that’s no fun!
What are some other easy christmas finger foods?
This recipe is definitely a winner for easy Christmas finger foods, but there are so many other fun ideas! Think about mini cheese balls rolled in nuts or herbs, cute little pretzel rods dipped in chocolate and sprinkles, or even simple caprese skewers with a festive twist. Anything bite-sized and a little bit sparkly usually fits the bill for holiday appetizer boards! For more dairy-free cookie recipes, check out our other posts.
Sharing Your Christmas Finger Foods Creations
I just LOVE seeing what you all whip up! If you give these easy Christmas finger foods a try, I’d be absolutely thrilled if you shared your experience. Did you add any fun twists? How did they go over at your party? Snap a pic and tag me or leave a comment below – I can’t wait to see your festive creations!
Print
Amazing Christmas Finger Foods in 1 Hour
- Total Time: 35 minutes
- Yield: 24 cookies 1x
- Diet: Vegetarian
Description
Discover a collection of festive and easy-to-make Christmas finger foods perfect for your holiday gatherings. These bite-sized appetizers are designed for quick entertaining and creating a cozy, festive atmosphere.
Ingredients
- 1 cup all-purpose flour
- 1/2 cup unsalted butter, softened
- 1/4 cup granulated sugar
- 1/4 cup powdered sugar
- 1 egg yolk
- 1 teaspoon vanilla extract
- 1/4 teaspoon salt
- 1/2 cup finely chopped pecans or walnuts (optional)
- Red and green decorating sugar
Instructions
- Cream together the softened butter and both sugars until light and fluffy.
- Beat in the egg yolk and vanilla extract.
- In a separate bowl, whisk together the flour and salt.
- Gradually add the dry ingredients to the wet ingredients, mixing until just combined.
- If using, stir in the chopped nuts.
- Chill the dough for at least 30 minutes.
- Preheat your oven to 325°F (160°C). Line baking sheets with parchment paper.
- Roll the dough into small balls, about 1 inch in diameter.
- Place the balls on the prepared baking sheets, leaving some space between them.
- Flatten each ball slightly with the bottom of a glass or your thumb.
- Sprinkle with red and green decorating sugar.
- Bake for 12-15 minutes, or until the edges are lightly golden.
- Let cool on the baking sheets for a few minutes before transferring to a wire rack to cool completely.
Notes
- For a healthier option, you can reduce the sugar slightly and add cinnamon or nutmeg for flavor.
- These cookies can be made ahead of time and stored in an airtight container at room temperature for up to 3 days.
- Consider adding a simple glaze or a touch of cream cheese frosting for extra flair.
- Prep Time: 20 minutes
- Cook Time: 15 minutes
- Category: Dessert/Appetizer
- Method: Baking
- Cuisine: American
Nutrition
- Serving Size: 1 cookie
- Calories: 120
- Sugar: 8g
- Sodium: 30mg
- Fat: 7g
- Saturated Fat: 4g
- Unsaturated Fat: 3g
- Trans Fat: 0g
- Carbohydrates: 13g
- Fiber: 1g
- Protein: 1g
- Cholesterol: 20mg
Keywords: christmas finger foods, easy christmas finger foods, holiday party appetizers, festive finger food recipes, christmas snack ideas, bite sized christmas treats, quick holiday finger foods, christmas appetizer boards