 Skip to content
Oh, cheese straws! If there’s one thing that just screams “party starter” or “I’m feeling fancy, but also really hungry,” it’s these little cheesy delights. Seriously, there’s just something incredibly satisfying about a perfectly crisp, savory cheese straw. I’ve been tinkering in the kitchen for ages, perfecting my baked goods, and trust me when I say that making your own cheese straws at home is not only way easier than you think, but it also elevates them from a simple snack to a truly impressive appetizer. They’re just so versatile!
Why You’ll Love These Easy Cheese Straws
Honestly, what’s not to love about these cheese straws? They’re ridiculously easy to whip up, which is always a win in my book! Plus, they’re the ultimate crowd-pleaser, perfect for when you’ve got folks coming over or just want a little something special.
Quick and Simple Preparation
Seriously, you can have these ready to bake in under 20 minutes. The dough comes together so fast, and you don’t need any fancy equipment. It’s the perfect way to make delicious cheese straws without a fuss.
Crowd-Pleasing Party Appetizers
These little guys are always a hit at any gathering! Whether it’s a holiday party, a casual get-together, or just afternoon tea, these cheese straws are guaranteed to disappear fast. They look so elegant, too!
Gather Your Ingredients for Homemade Cheese Straws
Alright, let’s get down to business! To make these absolutely divine homemade cheese straws, you’ll need to raid your pantry and fridge. Don’t worry, it’s mostly stuff you probably already have on hand. Having everything prepped and measured makes the whole process a breeze, so you can get to the fun part – eating them!
Essential Ingredients
First up, we’ve got our dry stuff: 2 cups of good old all-purpose flour, 1 teaspoon of salt to make everything pop, and then for a little kick, about 1/2 teaspoon of black pepper. For the star of the show, you’ll need 2 cups of nicely shredded sharp cheddar cheese. Make sure it’s sharp; it really makes a difference! And the secret to a flaky, tender dough? 1 cup (that’s two sticks, folks!) of unsalted butter that’s been kept nice and cold, then cut into little cubes. Lastly, we’ll need about 1/4 cup of ice water to bring it all together.
Optional Flavor Boosters
Now, if you like a little heat, which I totally do, you’ll want to grab about 1/4 teaspoon of cayenne pepper. It just gives these cheese straws a lovely little warmth that sneaks up on you. The black pepper is essential for that savory bite, but feel free to add a pinch more if you’re a pepper lover!
Step-by-Step Instructions for Perfect Cheese Straws
Alright, let’s get these doughy little wonders into their final, glorious form! This is where the magic really happens, and honestly, it’s pretty straightforward. Just follow along, and you’ll have the most amazing homemade cheese straws in no time.
Preparing the Dough
First things first, grab a big bowl – you know, the sturdy kind. Whisk together your flour, salt, black pepper, and that optional cayenne pepper if you’re feeling adventurous. Now, for the butter; toss those cold, cubed pieces into the flour mixture. Use a pastry blender or just your fingertips to cut it all in until it looks like coarse crumbs. It’s okay if there are still some pea-sized bits of butter; that’s good stuff! Next, stir in all that lovely shredded cheddar cheese. Finally, it’s time for the ice water. Add it a little at a time, mixing until the dough just starts to cling together. Seriously, *just* until it comes together. Overmixing is the enemy of flaky cheese straws, so be gentle!
Shaping and Baking Your Cheese Straws
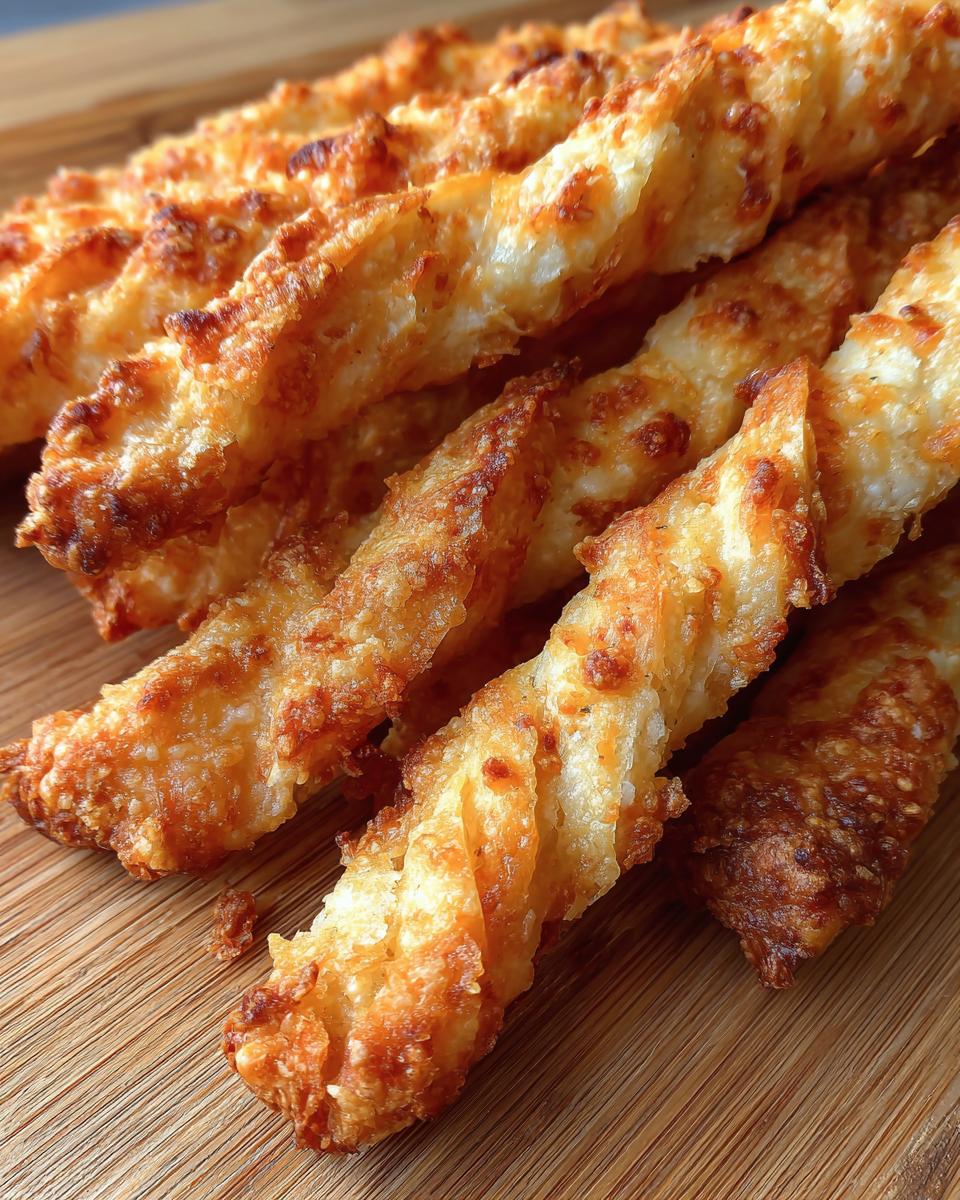
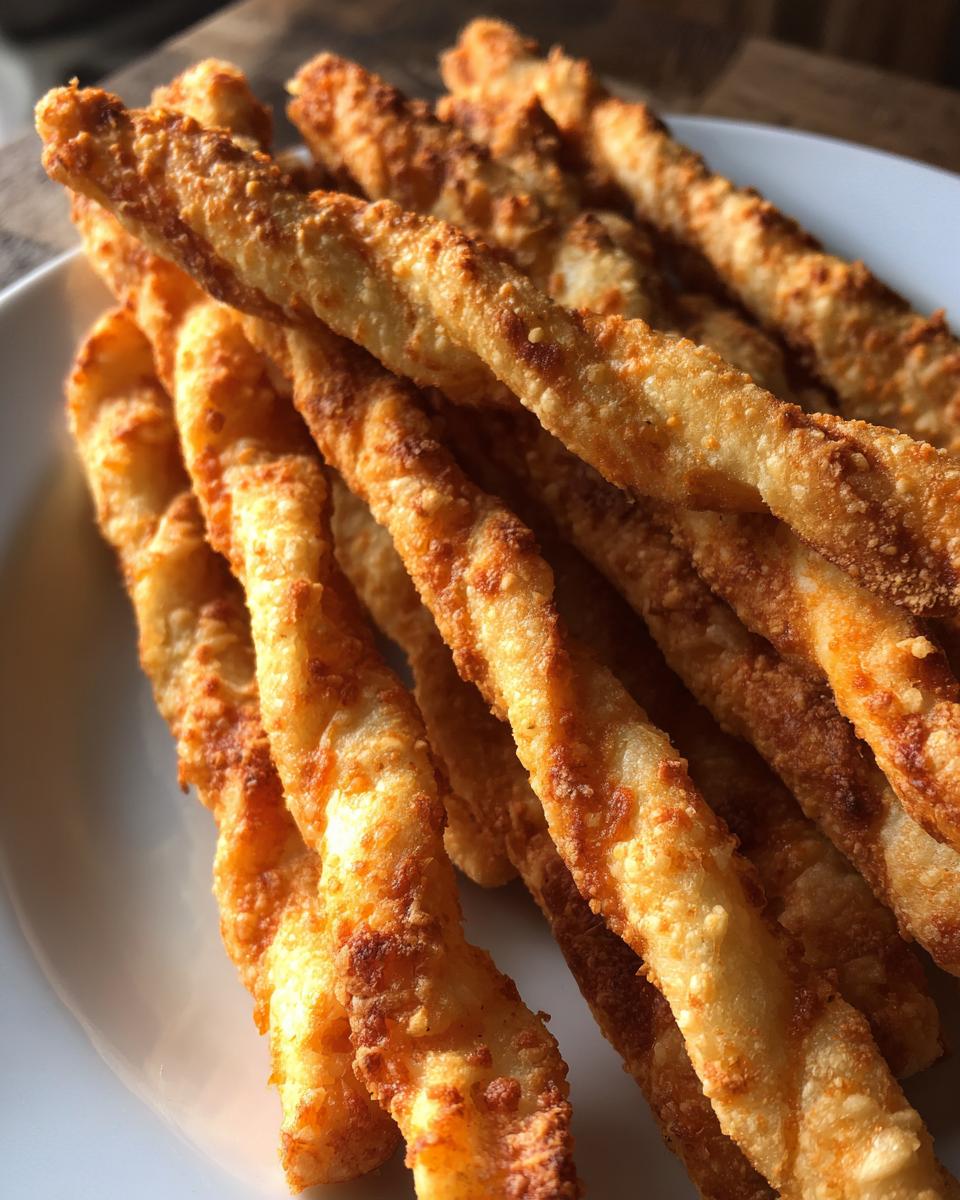
Turn that glorious dough out onto a lightly floured surface. Give it a gentle knead, maybe just a couple of times, to make sure it’s cohesive. Now, roll it out into a rectangle. I usually go for about a quarter-inch thick – not too thin, not too thick. Grab a knife or a pizza cutter and slice it into strips, about half an inch wide. This is the fun part: you can leave them as is, or give each strip a little twist for that classic spiral look. It makes them look extra fancy! Arrange your cheese straws on your parchment-lined baking sheets, giving them a little space. Pop them into your preheated 400°F (200°C) oven for about 12 to 15 minutes. You’re looking for that beautiful golden brown color and a nice, crispy edge.
Cooling and Serving
Once they’re perfectly baked, let them hang out on the baking sheets for a few minutes. This helps them set up and get even crispier. Then, carefully transfer them over to a wire rack to cool completely. This is crucial for getting that perfect crunch. If you try to eat them piping hot off the tray, they might still be a bit soft. Patience, my friends, patience! Once they’re cool, they’re ready to be devoured!
Tips for Achieving the Best Cheese Straws
Okay, so you’ve made cheese straws before, but they didn’t quite hit that perfect crispy mark? Or maybe they were a little bland? Don’t worry, I’ve learned a few tricks over the years that make all the difference. Getting these little guys just right is all about a few key details, and I’m happy to share my secrets so your homemade cheese straws are absolutely spectacular!
Achieving the Perfect Texture
The absolute biggest secret to super crispy cheese straws is using *cold* butter and not overworking the dough. Seriously, keep that butter chilled until the last possible second! When you cut it into the flour, you want little pea-sized pieces to remain. This creates steam pockets as they bake, leading to that flaky, shatteringly crisp texture we all love. And remember, just mix until the dough *barely* comes together. Overmixing develops gluten, which makes them tough instead of delightfully crunchy.
Flavor Variations for Your Cheese Straws
While sharp cheddar is my go-to for these cheese straws, don’t be afraid to play around! Try a mix of cheddar and Monterey Jack for extra creaminess, or even some Gruyère for a nutty depth. If you’re craving spicy cheese straws, crank up the cayenne or add a pinch of red pepper flakes right into the dough. You could even toss in some finely chopped herbs like chives or rosemary for a fresh twist. The possibilities are endless!
Frequently Asked Questions About Cheese Straws
Got questions about these cheesy little wonders? I’ve got answers! Making cheese straws can sometimes bring up a few queries, especially if you’re trying out new recipes or variations. Let’s tackle some of the most common ones so you can bake with confidence!
Can I make gluten-free cheese straws?
Oh, absolutely! If you need gluten-free cheese straws, it’s totally doable. Just swap out the all-purpose flour for a good quality gluten-free all-purpose flour blend. Make sure your cheese is also certified gluten-free, as sometimes additives can sneak in. The texture might be slightly different depending on the blend you use, but they’ll still be delicious!
How do I store homemade cheese straws?
Storing your homemade cheese straws is key to keeping them nice and crisp. Once they’re completely cooled (and I mean *completely*), pop them into an airtight container. They’re best enjoyed within about 3 days, but honestly, they rarely last that long in my house! Just make sure the lid is sealed tight to keep out any moisture.
Can I freeze cheese straws?
Yes, you can definitely freeze cheese straws! The best way to do it is to bake them until they’re golden and let them cool completely. Then, arrange them in a single layer on a baking sheet and freeze until solid, about an hour. Once they’re frozen hard, you can transfer them to a freezer-safe bag or container. To reheat, just pop them on a baking sheet at around 300°F (150°C) for about 5-10 minutes to bring back that lovely crispiness.
Ingredient Notes and Substitutions for Cheese Straws
Making these cheese straws is pretty forgiving, which is great! But there are a few little things that can make them even better, or help you out if you’re missing something. Don’t be afraid to experiment a little with these ingredients for your cheese straws!
Cheese Choices
Sharp cheddar is my absolute favorite for these cheese straws, giving them that perfect tangy bite. But hey, cheese is versatile! You could totally use a mix of cheddar and Monterey Jack for a creamier texture, or even throw in some Gruyère for a nuttier, more sophisticated flavor. Just make sure whatever cheese you pick is finely shredded so it melts beautifully into the dough. The sharp cheddar really is a classic for a reason, though!
Flour Alternatives
If you’re going gluten-free, remember what I mentioned earlier! A good gluten-free all-purpose flour blend works wonders. Just be aware that different blends can absorb liquid a bit differently, so you might need to adjust the ice water slightly. For other flour needs, sticking to all-purpose is usually best for that classic crispy texture. I haven’t really experimented with things like almond flour here, so I can’t say for sure how that would turn out for these specific cheese straws!
Enjoying Your Savory Cheese Snacks
Seriously, these cheese straws are so versatile! They’re the perfect little savory cheese snacks to have on hand. I love serving them as elegant appetizers at parties, especially during the holidays when everyone’s looking for something a little special. They’re also fantastic just for snacking while you’re watching a movie or having your afternoon tea. They even make cute little cheese straw bites for kids!
Serving Occasions
Honestly, any occasion is a good occasion for cheese straws! They’re a guaranteed hit as party cheese straws, making them a must-have for birthdays and get-togethers. And when the holidays roll around, these holiday cheese straws are always the first thing to disappear from the appetizer table. They’re just so easy to grab and pop in your mouth!
Estimating Nutritional Information for Cheese Straws
Now, while taste is king, it’s always good to have a general idea of what you’re nibbling on! Here’s an estimated breakdown for our delicious cheese straws. Keep in mind, these are approximate values per serving (about 3 straws), and can vary slightly based on your specific ingredients.

Amazing Cheese Straws in Under 20 Minutes
- Total Time: 35 minutes
- Yield: Approximately 3 dozen 1x
- Diet: Vegetarian
Description
Crispy and savory cheese straws, perfect for any occasion.
Ingredients
- 2 cups all-purpose flour
- 1 teaspoon salt
- 1/2 teaspoon black pepper
- 1/4 teaspoon cayenne pepper (optional)
- 1 cup (2 sticks) unsalted butter, cold and cubed
- 2 cups shredded sharp cheddar cheese
- 1/4 cup ice water
Instructions
- Preheat your oven to 400°F (200°C). Line baking sheets with parchment paper.
- In a large bowl, whisk together the flour, salt, black pepper, and cayenne pepper if using.
- Cut in the cold butter using a pastry blender or your fingertips until the mixture resembles coarse crumbs.
- Stir in the shredded cheddar cheese.
- Gradually add the ice water, mixing until the dough just comes together. Do not overmix.
- Turn the dough out onto a lightly floured surface and gently knead a few times.
- Roll out the dough into a rectangle about 1/4-inch thick.
- Cut the dough into 1/2-inch wide strips. You can twist each strip for a spiral effect.
- Place the strips onto the prepared baking sheets.
- Bake for 12-15 minutes, or until golden brown and crisp.
- Let cool on the baking sheets for a few minutes before transferring to a wire rack to cool completely.
Notes
- For gluten-free cheese straws, use a gluten-free all-purpose flour blend and ensure your cheese is gluten-free.
- For spicy cheese straws, increase the cayenne pepper or add a pinch of red pepper flakes.
- These can be made ahead and stored in an airtight container at room temperature for up to 3 days.
- Prep Time: 20 minutes
- Cook Time: 15 minutes
- Category: Appetizer
- Method: Baking
- Cuisine: American
Nutrition
- Serving Size: 3 straws
- Calories: 150
- Sugar: 1g
- Sodium: 200mg
- Fat: 11g
- Saturated Fat: 7g
- Unsaturated Fat: 4g
- Trans Fat: 0g
- Carbohydrates: 10g
- Fiber: 0.5g
- Protein: 4g
- Cholesterol: 30mg
Keywords: cheese straws, easy cheese straws recipe, homemade cheese straws, cheese straws appetizers, cheese straws with cheddar, party cheese straws, gluten-free cheese straws, spicy cheese straws, cheese straw bites, savory cheese snacks, holiday cheese straws