 Skip to content
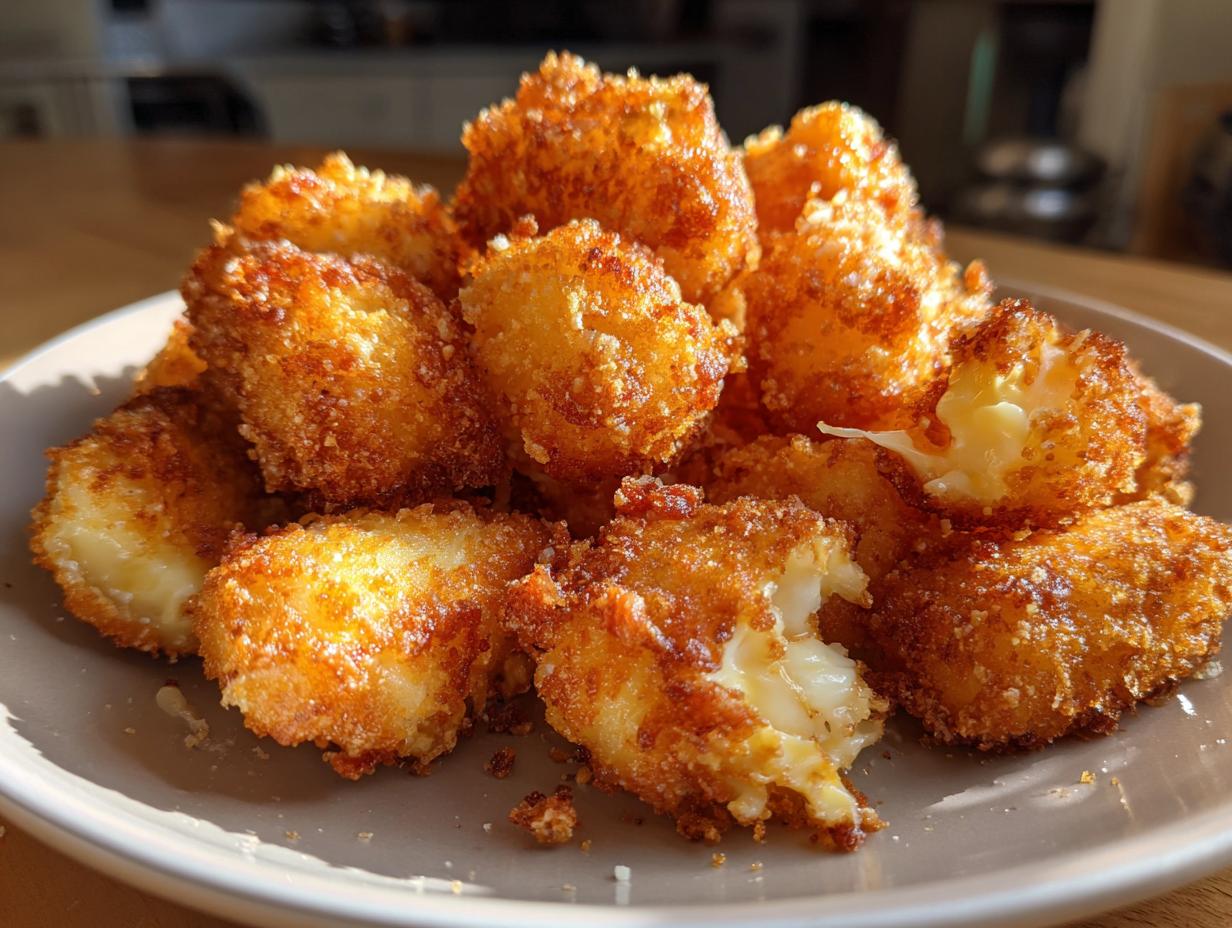
Oh, cheese curds! Seriously, is there anything better than that satisfying little squeak when you bite into a fresh one? I used to think the only way to get them was from a specialty shop or a fair, but let me tell you, making your own cheese curds at home is a total game-changer. It’s surprisingly simple, and the reward? Pure, unadulterated cheesy bliss. You get to control the quality, the saltiness, and that amazing freshness that just can’t be beat. Trust me, once you try homemade, you’ll never go back!
Why Make Your Own Cheese Curds?
Okay, so why bother making your own cheese curds when you can just buy them? Simple: freshness and flavor! Those store-bought ones are good, sure, but nothing, and I mean NOTHING, compares to the taste and texture of cheese curds made just minutes before you eat them. They’re so much softer, milder, and that signature “squeak” is just… perfection. Plus, there’s this amazing sense of accomplishment when you tell people, “Yep, I made these myself!” It’s a fun little DIY project that delivers instant gratification.
A Culinary Journey: From Milk to Squeaky Cheese Curds
Honestly, the process of turning regular old milk into these delightful little nuggets of cheese is kind of magical. It feels like you’re performing a little kitchen alchemy! You start with just a few basic ingredients, and with a little gentle heating and stirring, you end up with these glorious, fresh cheese curds. It’s a culinary journey that’s surprisingly short and incredibly rewarding. You’ll be amazed at how simple it is to create something so delicious right on your stovetop.
Gather Your Simple Ingredients for Cheese Curds
Okay, so you’re ready to whip up some magic, right? The best part about making cheese curds at home is that you don’t need a fancy pantry filled with obscure items. Nope! You probably have most of what you need right now. We’re talking about just a few simple, everyday ingredients that come together beautifully.
First up, you’ll need 1 gallon of whole milk. Now, this is important – make sure it’s not ultra-pasteurized if you can help it. The regular pasteurized stuff works so much better for getting nice, clean curds. Then, for the magic part, we grab 1/4 cup of distilled white vinegar and 1/4 cup of lemon juice. These are our curdling superheroes! And finally, just a touch of 1 teaspoon of salt to make everything taste just right. See? Totally doable!
Ready to Dive In? Here’s How to Make Your Own Cheese Curds!
Alright, let’s get down to business! Making your own cheese curds is honestly one of the most satisfying kitchen adventures. It’s not complicated at all, and the payoff is HUGE. You’re going to transform simple milk into these amazing, squeaky little bites of happiness. Just follow these steps, and you’ll be snacking on your own homemade cheese curds in no time. It’s a truly magical process, and I promise it’s easier than you think!
Heating the Milk: The First Crucial Step
First things first, grab a big pot and pour in your gallon of whole milk. We need to heat this up nice and gently. Aim for around 180°F (82°C). You don’t want it boiling, just nice and hot. Keep stirring it occasionally so it doesn’t scorch on the bottom. This temperature is super important for getting those curds to form perfectly.
Curdling the Milk for Fresh Cheese Curds
Once your milk hits that perfect 180°F mark, it’s time for the magic to really happen! Turn off the heat and slowly stir in your distilled white vinegar and lemon juice. You’ll start to see the milk separate almost immediately – that’s the good stuff! You’ll see little white clumps (the curds!) floating around in a yellowish liquid (the whey). Keep stirring gently for a few minutes until it looks really well separated. This is how we make fresh cheese curds!
Straining and Shaping Your Cheese Curds
Now for the messy, but fun, part! Line a colander with cheesecloth (or a clean, thin kitchen towel if you don’t have cheesecloth). Carefully pour your curdled milk mixture into the lined colander. Let the whey drain out – you can save this for other recipes, by the way! Once most of the liquid has dripped away, gather up the corners of the cheesecloth and gently squeeze out as much excess liquid as you can. You want a nice, compact ball of curds. Then, dump them out onto a clean surface and knead in that salt. Just fold and press them together until the salt is evenly distributed. This really brings out the flavor!
Seasoning and Enjoying Your Cheese Curds
Once you’ve kneaded in the salt, your cheese curds are basically ready to go! They’ll be warm and super fresh. The best way to enjoy them is right away, just like this. They have that perfect “squeak” when you bite into them. Seriously, this is the ultimate cheese curds snack. You can eat them plain, or if you want to get fancy, a little sprinkle of pepper or even a drizzle of hot sauce is amazing. Just dive in and savor that homemade goodness!
Tips for Perfect Cheese Curds Every Time
Okay, so we’ve made these amazing cheese curds, but how do we make sure they’re *perfect* every single time? It really comes down to a few key things. The “squeak” is totally achievable, trust me! It’s all about that freshness and the right ingredients. Plus, knowing a few tricks can save you from a curd-making mishap. We want these to be the star of any cheese curds recipe you try!
Selecting the Best Milk for Cheese Curds
The absolute biggest factor for getting fantastic curds? It’s gotta be the milk! Seriously, use the freshest, highest-quality whole milk you can find. Avoid ultra-pasteurized milk if possible; the regular pasteurized stuff just curdles better. Think of it as the foundation for your best cheese for curds. Good milk means good curds, plain and simple!
Troubleshooting Common Cheese Curds Issues
So, what if your milk just isn’t cooperating? If you don’t see enough curds forming, don’t panic! You can try adding just a *tiny* bit more vinegar or lemon juice, a teaspoon at a time, and gently stirring. Sometimes the milk just needs a little extra nudge. Also, make sure your heat is right – too low and they won’t form, too high and they can get tough. It’s a delicate balance, but totally worth mastering!
Delicious Ways to Serve Your Cheese Curds
Okay, so you’ve made these glorious, squeaky little cheese curds. What now? Well, you could honestly just eat them all straight from the bowl (no judgment here!), but there are SO many other amazing ways to enjoy them. These fresh beauties are way more versatile than you might think and can totally elevate your snack game. Get ready for some serious deliciousness!
Classic Fried Cheese Curds and Beyond
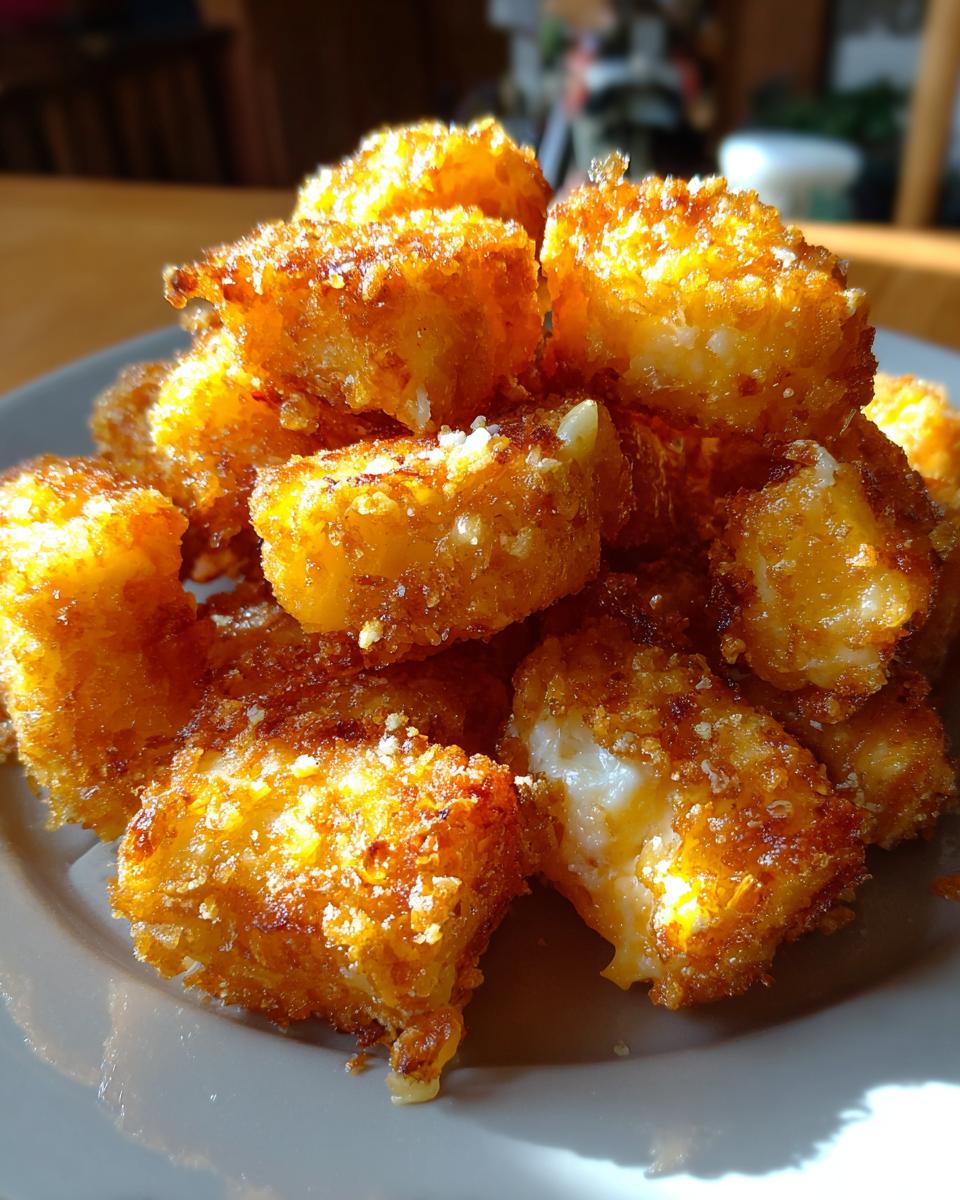
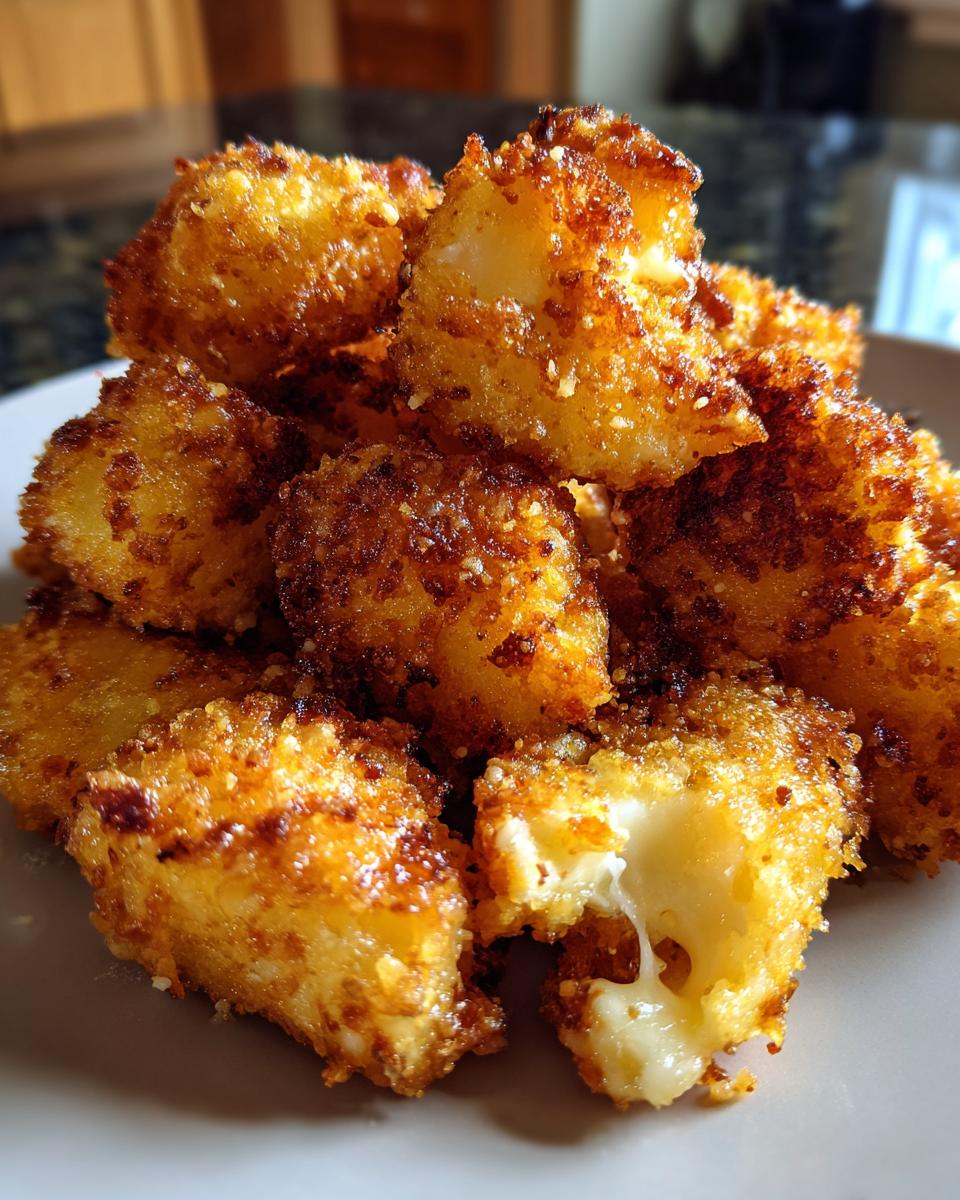
You absolutely *have* to try the classic fried cheese curds. Seriously, it’s a rite of passage for homemade curds! Dredge them in your favorite seasoned flour and breadcrumb mixture, then fry them until they’re golden brown and irresistibly crispy. The inside gets all melty and gooey while the outside stays perfectly crunchy. It’s the ultimate comfort food and a fantastic fried cheese curds recipe to master.
Poutine with Homemade Cheese Curds
My absolute favorite way to use these is in poutine. Forget those boring, hardened cheese curds some places use – fresh, melty ones are the *only* way to go. Pile your hot fries high, drown them in rich gravy, and then strategically place your warm, squeaky cheese curds right on top. They’ll start to soften and get all gooey in the best way. It’s a Canadian classic, and with homemade curds, it’s pure heaven.
Appetizer Ideas Featuring Cheese Curds
Beyond frying and poutine, these little guys are perfect for a quick appetizer. Skewer them with some cherry tomatoes and basil leaves for a fun caprese-inspired bite. Or, toss them into a warm pasta dish or a hearty soup just before serving. They add this wonderful, mild cheesy flavor and a fun texture to so many dishes. So many easy cheese curds appetizer ideas!
Storing and Reheating Your Fresh Cheese Curds
Okay, so maybe you made a LOT of cheese curds (it happens!) and have some leftovers. The absolute best way to enjoy these is fresh, right after you make them, when they have that perfect squeak. But if you do have some left, store them in an airtight container in the fridge for a day or two. They won’t be quite as squeaky, but they’ll still be yummy. To reheat, a quick zap in the microwave for just a few seconds usually does the trick to warm them up, but honestly, they’re best eaten the day they’re made!
Frequently Asked Questions About Cheese Curds
Got questions about these little wonders? I don’t blame you! Making cheese curds at home is super rewarding, but you might have a few things on your mind. Let’s clear up some common queries!
Q: What’s the best way to get that signature “squeak” in my cheese curds?
The squeak is all about freshness and temperature! It happens when the cheese curd is still warm and the protein strands are intact. The colder they get, the less they squeak. That’s why eating them right after making them is key! Using whole milk also helps achieve that perfect texture.
Q: Can I really use skim milk or low-fat milk for this recipe?
Honestly, for the best results, especially if you’re aiming for that lovely squeak and good curd formation, whole milk is really the way to go. Low-fat or skim milk just doesn’t have enough fat content to create those really nice, cohesive curds that give you that satisfying texture. Stick with whole milk for your cheese curds recipe!
Q: I tried making cheese curds, but they didn’t form properly. What went wrong?
Don’t worry, it happens! The most common culprits are using ultra-pasteurized milk or not getting the milk hot enough. Make sure your milk is heated to around 180°F (82°C) and that you’re using regular pasteurized whole milk. Also, ensure your vinegar and lemon juice are fresh! For more information on the science of cheesemaking, you can check out resources on food safety.
Nutritional Snapshot of Cheese Curds
Just a heads-up, these numbers are approximate and can vary based on your specific ingredients and how much salt you add! But as a general idea, a 1-ounce serving of these delicious homemade cheese curds typically has about 80 calories, around 5g of fat, 6g of protein, and just 1g of carbohydrates. Enjoy them knowing they’re a tasty treat!
Print
Amazing Cheese Curds: 1 Way to Blissful Bites
- Total Time: 45 minutes
- Yield: Approximately 1 lb 1x
- Diet: Vegetarian
Description
Learn how to make delicious cheese curds at home. This recipe guides you through the simple steps to create fresh, squeaky cheese curds perfect for snacking or adding to your favorite dishes.
Ingredients
- 1 gallon whole milk
- 1/4 cup distilled white vinegar
- 1/4 cup lemon juice
- 1 teaspoon salt
Instructions
- Heat milk in a large pot until it reaches 180°F (82°C).
- Stir in vinegar and lemon juice.
- Continue to heat and stir gently until the milk curdles.
- Strain the curds through cheesecloth, pressing out excess liquid.
- Knead in salt until evenly distributed.
- Serve fresh or use in recipes.
Notes
- Use fresh, high-quality milk for the best results.
- Adjust the amount of vinegar and lemon juice if curds do not form.
- Cheese curds are best enjoyed immediately after making.
- Prep Time: 15 minutes
- Cook Time: 30 minutes
- Category: Appetizer/Snack
- Method: Stovetop
- Cuisine: American
Nutrition
- Serving Size: 1 ounce
- Calories: 80
- Sugar: 1g
- Sodium: 60mg
- Fat: 5g
- Saturated Fat: 3g
- Unsaturated Fat: 2g
- Trans Fat: 0g
- Carbohydrates: 1g
- Fiber: 0g
- Protein: 6g
- Cholesterol: 20mg
Keywords: cheese curds, homemade cheese curds, how to make cheese curds, fresh cheese curds, squeaky cheese curds, cheese curds recipe, dairy snack